Communicating through TX/RX pins
Learn how to use HardwareSerial to communicate across TX/RX pins and view it on the computer using a USB TTL Serial Cable
Info on using HardwareSerial
- Serial = COM1 = TX/RX pins
- While this sample doesn’t use a serial event, if you want to use serialEvent, you will need to:
- Create a method for
serialEvent()that returns void and has no parameters in your main.cpp. This method will be called when data is available on the serial1 port at the end of the loop. - Right click on the Project in the Solution Explorer, then select Properties.
- Under Configuration Properties -> C/C++ -> Preprocessor, add SERIAL_EVENT; to Preprocessor Definitions.
- Create a method for
Required Components
- FTDI Cable
- 2 wires to connect the TX and RX pins to the FTDI Cable
Create the project
- Create a new project from the template.
- Plug the USB end of the cable into your computer’s USB port.
- Open up Device Manager on your development machine and find out which COM port is being used by the adapter.
- Open a terminal program like Tera Term
- Set the program to monitor the serial connection from the COM port you found in Step 5.
- Make sure your options are as shown below (with the Port set to the COM port you found in Step 5):
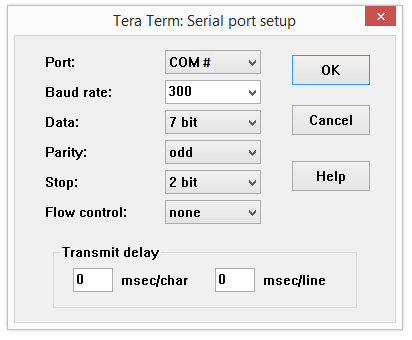
- If you are using Tera Term, you can get to the menu shown above by clicking on Setup -> Serial port..
- Hook up the Orange pin from the cable to RX (pin 0)on your Galileo
- Hook up the Yellow pin from the cable to TX (pin 1) on your Galileo
- Replace the existing code in main.cpp of the project with the code below:
Code
Main.cpp of the Write Project
#include "stdafx.h"
#include "arduino.h"

int _tmain(int argc, _TCHAR* argv[])
{
	return RunArduinoSketch();
}

void setup()
{
    Serial.begin(CBR_300, Serial.SERIAL_7O2);
}

int count = 0;

void loop()
{
    if (Serial.write('a' + count) != 1)
    {
        Log(L"Serial.write failed\n");
    }else{
        Log(L"%c being sent\n", 'a' + count++);
    }
    if (count == 26) { count = 0; }
    Sleep(1000);
}